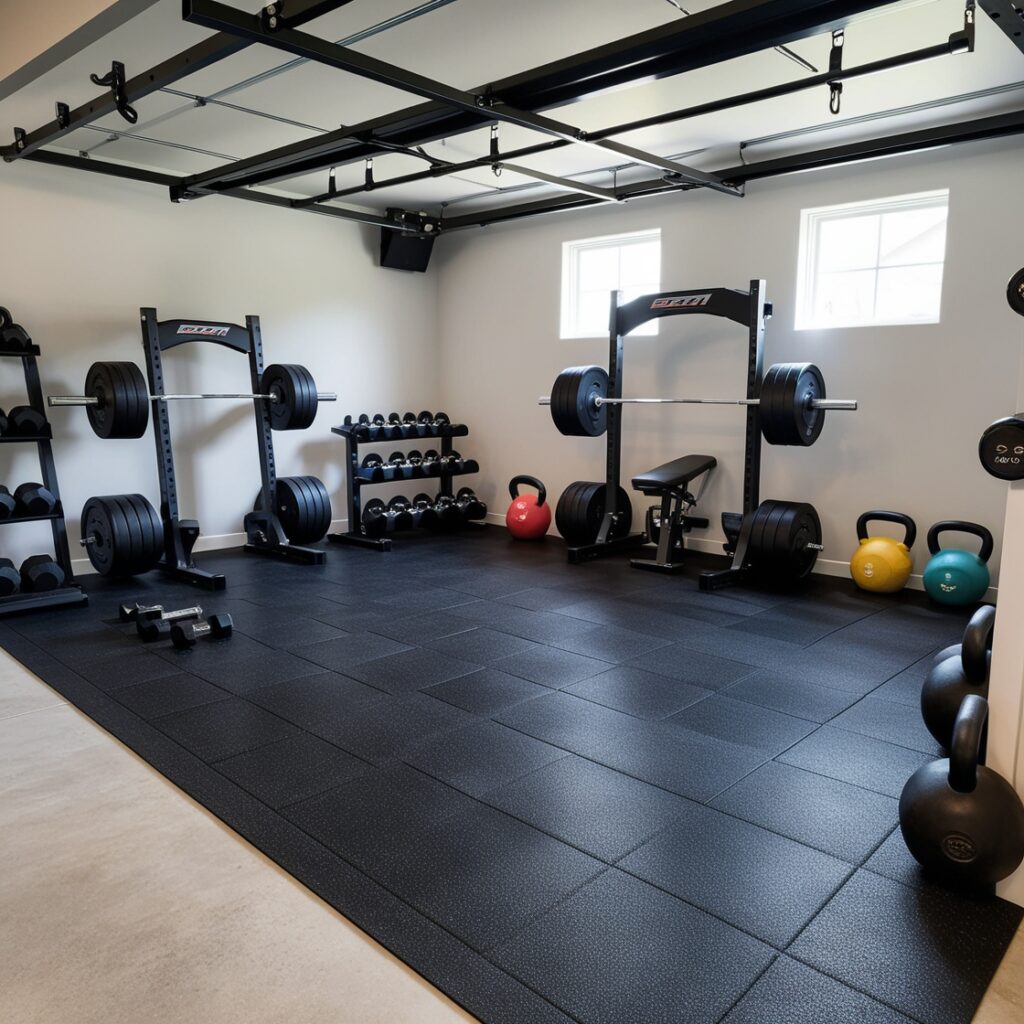
Turning your garage into a gym is exciting – imagine not having to commute to work out, having all your favorite equipment close by, and the freedom to turn your garage into a workout paradise. Before you start moving in squat racks or rolling out mats, there’s a key component you might overlook: the flooring. It’s more than just a base; it’s the foundation of every workout you’ll do in this space. The right garage gym flooring can keep you safe, protect your equipment, and even reduce noise for a more enjoyable experience. Here’s everything you need to know to make a flooring choice that truly supports your fitness goals.
Table of Contents
Why Concrete Alone Isn’t Ideal
Most garages are built with a durable concrete floor designed for cars, not workouts. Concrete may be strong, but it doesn’t provide the impact absorption your body needs during high-intensity or heavy lifting workouts. Dropping weights on it can damage your equipment and the floor itself. Plus, concrete can be incredibly slick with sweat and lacks insulation, leaving your garage gym uncomfortably cold in winter and unbearably hot in summer. So, if you want a safe, comfortable, and noise-friendly gym setup, you’ll need to consider other flooring options.
Exploring Your Options: Types of Garage Gym Flooring
You have several flooring types to choose from, each with strengths and drawbacks. Here’s a quick breakdown of the main types and who they might work best for.
1. Rubber Flooring: The Gold Standard for Garage Gyms
Rubber flooring is widely considered the best choice for garage gyms because of its resilience, shock absorption, and durability. Rubber mats come in rolls for seamless coverage or interlocking tiles that are easy to install and adjust. Rubber provides the essential grip to prevent slipping, keeping you safe during intense workouts.
- Best For: Heavy lifting, HIIT workouts, and all-around gym use.
- Pros: Durable, shock-absorbent, slip-resistant.
- Cons: Higher cost, but well worth it for longevity.
2. Foam Tiles: Lightweight and Comfortable, But Limited
Foam tiles are often popular for being lightweight and comfortable, especially for exercises like yoga, stretching, or light cardio. However, foam doesn’t hold up as well to heavy equipment or high-impact activities, as it can compress under weight and lead to uneven surfaces over time.
- Best For: Bodyweight exercises, light cardio, or yoga.
- Pros: Affordable, easy to install, soft underfoot.
- Cons: Not ideal for heavy weights or intense workouts.
3. Carpet Tiles: Affordable and Easy to Install
Carpet tiles are an option some people choose due to their affordability and ease of installation. However, they aren’t well-suited for serious gym setups as they tend to absorb moisture and odors over time.
- Best For: Primarily for bodyweight or light cardio workouts.
- Pros: Budget-friendly, easy to install.
- Cons: Absorbs sweat, which can lead to odors; not durable for heavy lifting.
Choosing the Right Thickness: Protect Your Joints and Equipment
When selecting your flooring, thickness matters. If you’re into lifting, a thickness of at least half an inch is recommended, with an inch or more ideal for heavy-impact exercises like deadlifts. Thicker tiles provide better shock absorption, protecting both your joints and your equipment.
For foam or carpet tiles, anything less than half an inch can wear down quickly, especially under weights. Investing in thicker flooring might cost more upfront, but it’ll save you money on replacements in the long run and offer more comfort and stability.
Budget-Friendly Flooring Hacks

Setting up a garage gym doesn’t mean draining your wallet—especially when it comes to flooring. One of the most popular tricks among garage gym enthusiasts? Horse stall mats. Yes, these are the same heavy-duty rubber mats you’d find in a stable, designed to withstand the weight of horses and all their movement. They’re durable, shock-absorbent, and just right for a gym where you’re lifting and dropping weights. Horse stall mats are typically around 4 feet by 6 feet, with a thickness of about ¾ inch—perfect for handling the demands of even the most intense workouts.
You can often find these mats at farm supply stores, like Tractor Supply Co., for a fraction of what typical gym mats would cost. But here’s a pro tip: Check the mats for small imperfections before you buy. Stores often discount mats with minor scuffs or irregularities that won’t affect performance but can knock the price down further.
If horse stall mats aren’t your style or aren’t readily available, don’t worry—there are other ways to find affordable, high-quality flooring. Here are some additional time- and money-saving tips:
- Browse Online Marketplaces: Sites like Facebook Marketplace, Craigslist, and OfferUp often list gently used gym flooring for sale at bargain prices. Gyms that are upgrading or closing may sell rubber flooring at a steep discount. Set up alerts for keywords like “rubber flooring” or “gym mats” so you get notified right when a deal pops up. You’d be surprised how often people sell off gym gear, including flooring, for a fraction of the original cost.
- Go for Bulk Purchases: If you’re part of a fitness community, consider teaming up with friends or family who are also setting up home gyms. Buying rubber flooring in bulk can often save you significantly per square foot. Look for suppliers or stores that offer bulk discounts or clearance sales on larger quantities.
- Timing Your Purchase: Many stores and online retailers offer seasonal sales or discounts, especially around New Year’s when fitness equipment is in high demand. Check with local flooring or gym equipment stores to see if they have annual sales or clearance events. You can often negotiate a better deal by visiting during quieter retail periods, like late summer.
- Opt for DIY Solutions: If all else fails, consider layering cheaper materials beneath your chosen flooring. For example, you can create a cushioned base with plywood or foam boards under rubber mats for extra insulation and shock absorption without paying for thicker (and more expensive) flooring.
By getting creative and being a bit resourceful, you’ll find that setting up quality flooring for your garage gym doesn’t have to come at a premium price. These tricks are all about being savvy, knowing where to look, and sometimes, being patient enough to catch the right deal. It’s worth the effort when it means you’re investing in a foundation that supports your fitness goals without breaking the bank.
Installation Tips: Get a Pro-Level Look at Home

Once you’ve chosen your garage gym flooring, installing it correctly is key to creating a polished, professional-looking gym space that will last. A well-laid floor not only looks good but also prevents issues like shifting, gaps, and uneven surfaces that can be distracting—or even hazardous—during workouts. Here’s how to make your installation process smooth and effective.
Start with a Plan
Before placing a single tile or rolling out a mat, take a few minutes to plan your layout. Measure your garage and mark out where equipment like racks, weights, and benches will go. This will help you decide where to start laying your garage gym flooring and where you may need to cut tiles to fit around edges or corners. Starting in one corner of the garage and working outward usually helps to keep the tiles aligned and minimizes gaps.
For Interlocking Tiles: Time-Saving Installation Hacks
If you’ve opted for interlocking rubber tiles (a popular choice in garage gym flooring for their ease of use), start by laying them in one corner, pressing them firmly together as you go. Make sure each tile’s edges fit snugly with its neighbors to avoid gaps. Here’s a trick: Use a rubber mallet to tap tiles securely in place. This creates a tight bond without damaging the tiles and saves you from having to constantly readjust them.
When it comes to cutting tiles to fit around awkward areas, like the edges of walls or around equipment, a fresh utility knife will make all the difference. Measure the areas where cuts are needed, mark the tiles, and carefully slice along the line with the knife. For thicker rubber flooring, it might take a few passes with the knife, so take it slow. Once you’ve cut the tiles to fit, they should lock into place seamlessly.
Rolled Rubber Flooring: Achieve a Seamless Finish
If you’re using rolled rubber flooring, double-sided carpet tape can be a lifesaver, especially for keeping the edges and corners from lifting. Start by laying the roll flat and let it sit for 24 hours if possible—this will help remove any natural curl from the roll and make installation easier. To install, tape the edges and center of each roll to keep it secure, and press firmly to avoid any bubbles or bumps.
To prevent the floor from shifting during workouts, apply the tape in long strips along the perimeter and in a crosshatch pattern across the main area. This not only keeps the flooring secure but also helps avoid bunching or slipping when you’re lifting weights.
Finishing Touches for a Professional Look
To give your garage gym flooring a polished, professional look, be mindful of small details like gaps and seams. Even a small gap between tiles can collect dust and dirt over time, making maintenance a hassle. Double-check your work as you go, and adjust tiles to close any spaces.
If you plan to keep the garage door closed while working out, it’s wise to leave a slight gap between your flooring and the door track. Garage gym flooring can expand slightly in warm temperatures, and this small buffer will keep the mats from pushing up against the door track, ensuring that they lay flat and look neat year-round.
Pro Tips to Save Time and Ensure Longevity
To save even more time on installation and extend the life of your garage gym flooring, consider these quick tips:
- Buy extra tiles or a bit more rolled flooring than you need. This is helpful if you need to replace a section later on due to wear.
- Keep flooring cleaning supplies nearby, like a mild soap and water solution, to wipe up sweat and chalk right after workouts, which can extend the lifespan of your flooring.
- For large garages, consider hiring a professional installer, especially for rolled rubber flooring. It’s a small investment that can give you a perfectly leveled, flawless finish.
With a bit of planning and these time-saving tips, you’ll achieve a seamless, professional setup for your garage gym flooring. Each of these steps is designed to make your garage gym look polished and functional, providing you with a motivating workout space that’s as safe and practical as it is stylish
Keep It Clean: Maintenance Tips for Longevity

Once your garage gym flooring is in place, keeping it clean and fresh is key to preserving its longevity—and making sure it feels inviting every time you step in to work out. Between sweat, chalk, dust, and the dirt that sneaks in from outside, garage gym flooring can get grimy fast. Luckily, a few easy maintenance tricks can keep it looking (and smelling) like new with minimal effort.
Quick, Daily Cleaning Hacks to Save Time
For everyday upkeep, having a small cleaning routine makes all the difference. A handheld vacuum is perfect for picking up dust and debris without much effort, especially in high-traffic areas. For rubber flooring, a quick once-over with the vacuum can prevent dirt buildup and keep your garage gym flooring looking sharp. Another tip? Use a microfiber mop with a mild soap and water solution—this will wipe away sweat and chalk residue without leaving streaks.
To make cleaning even easier, keep a spray bottle filled with a homemade cleaning solution nearby: mix one part water with one part white vinegar for a natural, cost-effective cleaner. Spray it lightly over your garage gym flooring and wipe with a dry microfiber cloth for a quick refresh. This trick doesn’t just keep rubber mats clean; it also helps reduce any lingering odors.
Weekly Deep Clean for Garage Gym Flooring
For a more thorough clean, aim to deep-clean your garage gym flooring once a week. For rubber mats, a damp mop with a mild detergent (or your vinegar solution) is usually enough. Avoid harsh chemicals, as they can degrade rubber over time, especially with frequent use. If you’re cleaning carpet tiles, use a vacuum with a HEPA filter to tackle dirt and dust effectively. Carpeted flooring can absorb odors over time, so if needed, sprinkle a light layer of baking soda, let it sit for 15 minutes, and then vacuum to freshen up.
For foam tiles, spot-clean with a damp cloth as needed—these tiles can be more sensitive to moisture and may wear out faster with frequent washing. To extend their lifespan, consider covering foam areas with a mat or towel when doing exercises that involve heavy sweat, like HIIT or cardio.
Odor Control Tips for a Fresher Gym
Keeping your garage gym flooring smelling fresh is just as important as keeping it clean. To reduce odors, especially on rubber and carpet tiles, sprinkle baking soda across the floor once a month, let it sit for about an hour, then vacuum it up. For rubber flooring, you can also add a few drops of essential oil, like tea tree or lavender, to your vinegar solution for a refreshing scent that won’t damage the material.
Another hack? Air out your garage gym after workouts by keeping the garage door open for a few minutes. Good ventilation can prevent musty smells from building up over time, especially after intense workouts.
Seasonal Deep-Cleaning Tips to Prolong Your Flooring’s Lifespan
If you’re in an area with seasonal extremes, consider doing a more intensive clean-up every few months. Temperature shifts can affect your garage gym flooring, especially rubber, so a seasonal refresh can help extend its life. During these deep cleans, lift the mats (if possible) to sweep and mop underneath them, ensuring no trapped moisture or dust build-up.
For extreme winter or summer months, you might consider adding a light dusting of cornstarch or talcum powder under your rubber mats to absorb excess moisture that can sometimes gather between the floor and mats. This trick helps prevent slipping and keeps your garage gym flooring dry and secure.
Keeping Your Cleaning Supplies Handy
One final tip: store a small, designated cleaning kit in your garage. A set-up with a handheld vacuum, microfiber mop, and a spray bottle for your vinegar solution makes it easy to keep your garage gym flooring in top condition without needing to bring cleaning supplies from other parts of the house. Having these items within reach means you can quickly refresh the flooring right after workouts, making maintenance feel like less of a chore.
By integrating these simple but effective cleaning hacks, you’ll protect your garage gym flooring and keep your workout space feeling fresh and motivating. These small habits and tools make it easy to maintain a clean, welcoming environment without spending hours on upkeep—leaving you more time to focus on what matters most: crushing your workouts.
Insulate for Comfort Year-Round

Extreme temperatures can make a garage gym uncomfortable, but adding a subfloor can make a big difference.
Simple Subfloor Hacks for Better Insulation
One of the easiest ways to insulate your garage gym flooring is by adding a subfloor layer underneath your main gym mats. A common choice is plywood, which creates a barrier between the cold concrete and your workout surface. Not only does plywood help keep the cold out in winter, but it also adds extra shock absorption—a big win if you’re lifting heavy or doing high-impact workouts. Measure your garage space and cut the plywood to size, laying it down as a base before installing your rubber or foam flooring on top.
For added insulation, consider placing a layer of interlocking foam panels beneath your rubber flooring. Foam panels are lightweight, easy to install, and provide a thermal layer that helps keep warmth in during winter. This double-layer method (foam below, rubber on top) provides both temperature regulation and superior comfort.
Use Insulated Mats for Extra Warmth
Another effective option is insulated rubber mats, designed to retain heat and provide cushioning for garage gym flooring. Insulated mats are typically thicker than standard rubber flooring, which not only keeps your feet warmer but also adds extra shock absorption and soundproofing benefits. If you’re in an area with particularly cold winters, insulated mats can make your garage gym much more enjoyable without requiring additional heating.
For those with an existing garage gym flooring setup, a hack to add warmth is using area rugs or carpet remnants in high-contact areas where you’ll be standing or stretching. While not a replacement for rubber flooring, rugs provide a quick, affordable layer of insulation and are easy to remove when not needed.
Sealing Gaps to Lock In Comfort
To further insulate your garage gym, check for any gaps or drafts that could let cold air seep in or heat escape. Using a weatherproof sealant around doors and windows can help stabilize the temperature inside, so your garage gym flooring doesn’t feel icy underfoot during colder months. You can also consider weather-stripping around the garage door or even installing a draft stopper if needed. These small adjustments can make a noticeable difference in maintaining a comfortable temperature, allowing you to focus on your workouts without distractions.
Temperature Control with Portable Heaters and Fans
For extreme climates, adding portable heaters in winter and fans in summer can make your garage gym more comfortable. Look for heaters with a thermostat and auto-shutoff feature for safe, energy-efficient warming during colder months. For summertime workouts, a high-powered floor fan will keep air circulating and help your garage gym flooring feel cooler to the touch.
Prevent Moisture Build-Up with a Dehumidifier
If humidity is a concern, a dehumidifier can be a valuable addition, especially if your garage gym flooring is foam or carpeted. Excess moisture can lead to mold and mildew, which can damage your flooring and create unpleasant odors. By keeping humidity levels in check, a dehumidifier not only protects your garage gym flooring but also keeps your workout space fresh and comfortable year-round.
Extra Insulation for Sound and Comfort
One last hack for improved comfort? Acoustic panels or soundproofing tiles on the walls. These won’t just help reduce noise; they’ll also add a layer of insulation, helping retain warmth in winter and keep the space cooler in summer. Plus, soundproofing reduces echoes and vibrations that can carry through your house, making your garage gym more enjoyable for both you and your family.
By incorporating these insulation hacks, you’ll make your garage gym flooring more comfortable and functional throughout the year.
Soundproofing Tips for a Peaceful Workout Space

A home gym in the garage is perfect for convenient workouts, but the noise from dropping weights, clanking metal, or high-intensity cardio can easily echo throughout the house—and even annoy the neighbors. Soundproofing your garage gym flooring and walls doesn’t have to be complicated or expensive, but a few strategic steps can make a big difference in creating a quieter, more peaceful workout space. Here’s how to reduce noise and keep your workouts as private and undisturbed as possible.
Start with Noise-Absorbing Garage Gym Flooring
Choosing sound-absorbent garage gym flooring is one of the easiest ways to dampen noise from the start. Rubber flooring is an excellent option because it naturally absorbs shock and sound. Thick rubber mats, like ¾-inch horse stall mats, can significantly reduce the sound of weights hitting the floor. The thickness not only protects your equipment but also reduces vibration, making your garage gym quieter for everyone.
For even better sound absorption, consider layering foam panels underneath your rubber mats. This additional foam layer helps trap sound and prevents it from reverberating off the concrete. The result is a double-layered garage gym flooring setup that dampens both sound and impact, creating a quieter environment for heavy lifting.
Wall Soundproofing Hacks for Extra Noise Reduction
If noise is a major concern, adding some soundproofing to your walls can make a world of difference. Acoustic wall panels or foam tiles are affordable and effective at absorbing sound waves. For a quick and budget-friendly solution, hang thick blankets or moving pads on the walls surrounding your garage gym flooring area. This hack minimizes the bounce of sound waves, making your garage gym feel more contained and reducing noise that might travel through the house.
For a more permanent solution, you can use adhesive soundproofing panels that easily attach to the walls. These panels not only reduce sound but also help insulate the space, keeping your garage gym more temperature-stable year-round.
Preventing Noise Travel Through Doors and Windows
Garage doors and windows can be major culprits when it comes to letting sound escape. To address this, start by sealing any gaps around the garage door with weather-stripping or door seals. Draft stoppers at the base of the garage door can also help reduce noise leakage. Windows can be covered with thick, soundproof curtains that trap sound while also adding a layer of insulation to your garage gym flooring setup.
If you’re serious about noise reduction, consider installing a solid-core door to your garage. Solid-core doors are far better at soundproofing than hollow-core ones, and they’ll make a noticeable difference in containing noise.
Soundproof Mats for Targeted Noise Reduction
For areas where you’re dropping weights or using heavy equipment, placing additional soundproof mats on top of your garage gym flooring can add a targeted layer of noise control. These mats are specifically designed to reduce vibrations and impact noise, perfect for deadlifts or kettlebell workouts. They can be placed directly under lifting platforms or high-impact areas, preventing loud sounds from bouncing off the floor and walls.
Another simple option? Use rubber bumper plates instead of metal ones, as they’re much quieter on impact and reduce both noise and potential floor damage.
Ceiling Soundproofing for Ultimate Noise Control
If noise is still a problem, consider soundproofing the ceiling above your garage gym flooring. Adding soundproofing foam or dense insulation materials to the ceiling can keep noise from traveling upwards and disturbing anyone on floors above the garage. For an affordable approach, try hanging heavy curtains or tapestries from the ceiling to create an extra sound barrier.
Final Touches: Create a Quiet, Focused Gym Space
With these soundproofing hacks, your garage gym flooring and space can be transformed into a private, noise-friendly workout zone. Not only will it minimize distractions for others in your home, but it’ll also give you a more focused environment to push your workouts further.
By choosing the right sound-absorbing materials, like rubber garage gym flooring and foam wall panels, and adding these simple yet effective soundproofing strategies, you’re creating a space that’s not only functional but also peaceful and motivating. Enjoy the quiet, and let every rep and lift be yours alone—without the worry of disturbing anyone around you.
Wrap-Up: Building a Garage Gym That Works for You
Choosing the right flooring for your garage gym is more than a detail – it’s a fundamental step that impacts the quality, safety, and enjoyment of your workouts. Rubber mats, especially horse stall mats, are ideal for heavier lifts, while foam and carpet can work for lighter routines, albeit with some trade-offs. By investing a little time and thought into your flooring, you’re setting yourself up for years of safe, comfortable, and productive workouts.
In the end, your garage gym is a space you’re creating to suit you. With the right flooring, you’ll enjoy a space that invites you to work out, push your limits, and truly make your garage gym a little fitness paradise at home.


